
 EN



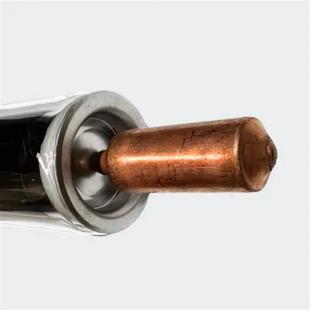
A direct answer comes first: yes, a damaged Demax vacuum tube can be replaced on its own without dismantling the whole collector. Evacuated-tube solar water heaters are built so each glass tube sits independently in the manifold, which makes field repair practical for hotels, factories, and remote sites. The rest of this guide explains why individual replacement works, how to spot a failed unit, the safe swap procedure, and a sensible maintenance rhythm.
A Real-World Replacement Scenario
Background — A Mountain Guesthouse Hot Water System
A mountain guesthouse in a cold region relied on a non-pressurized evacuated-tube array to serve thirty rooms. Each vacuum tube in the bank fed hot water into a shared storage tank through a common header. The property manager had budgeted for seasonal servicing but had never faced a sudden tube failure before the winter season began.
Problem — One Tube Lost Its Vacuum
Mid-November, guests reported lukewarm water in two rooms. Inspection showed one vacuum tube had developed a white, silvery film on the inner glass and felt cooler than its neighbours. That film is the classic symptom of vacuum loss: when the annular vacuum between the absorber and the borosilicate glass envelope breaks down, the selective coating oxidises and turns milky white, killing thermal performance. Vacuum is what stops convective heat loss; without it the absorber radiates energy straight to the glass and then to the air. That is why a single depressurised unit can lose most of its output while looking almost normal from a distance.
Solution and Result — Single Tube Swap Restored Service
The team ordered one spare vacuum tube and replaced only the failed unit the next morning. Hot water returned to normal within a day, and the remaining twenty-nine tubes kept working throughout winter. The episode proved that individual replacement protects uptime and avoids the cost of a full collector change-out.
Why Individual Replacement Works by Design
How Tubes Seat Into the Header via Silicone Seals
Each vacuum tube is not welded to the frame. A rubber seal at the open end presses the tube into a drilled port on the header, while a silicone gasket cushions the glass against thermal expansion. Because every tube seals independently, removing one does not disturb the sealing of the others. The mounting frame simply holds the tubes at the correct angle; it carries no fluid pressure itself. This modular approach also aligns with how thermal collectors are assessed under EN 12975 and how solar water heaters are tested under ISO 9459, where serviceability supports long field life. Independent sealing also limits failure spread: a crack at one port cannot drain the manifold, because each tube is captured by its own rubber seal and silicone gasket. That design keeps a single fault contained and makes maintenance predictable for site teams.
Reading the Failure Signs — Vacuum Loss and White Film
Beyond the visible white film, a failed vacuum tube often shows a dull, non-reflective absorber and lower outlet temperature. A simple check is to feel the tube after sunlight: a healthy heat pipe tube stays hot at the top, while a depressurised one stays cool. Replacing on sight prevents the weak unit from dragging down the whole array's efficiency. Leaving a depressurised unit in place invites condensation inside the glass envelope, which accelerates coating damage and can spread to neighbouring tubes through shared header strain. Prompt individual replacement keeps the array balanced and protects the investment in the wider system.
Safe Removal and Replacement Steps
Prepare Tools and Put On Safety Gloves
Before any work, isolate the system and let tubes cool. Wear safety gloves and eye protection, because a borosilicate vacuum tube can fracture if twisted. Have a new spare tube, a clean silicone gasket, and a soft brush ready. Working on a cool morning reduces the risk of thermal shock to the surrounding glass envelope. Confirm which unit is faulty before handling, using the feel test after midday sun. Mark the weak tube with a tag so the correct port is opened. This small step prevents disturbing healthy neighbours and keeps the maintenance visit short.
Extract the Failed Tube and Fit the Spare Tube
Twist the failed vacuum tube gently to break the rubber seal, then pull it straight out of the header port. Clean the port and seat a fresh silicone gasket. Insert the new tube, align it with the mounting frame, and rotate until the seal is snug. For heat pipe models, ensure the condenser tip seats fully into the manifold so heat transfers correctly. After fitting, run the system for a few minutes and confirm the new tube warms evenly with its neighbours. A correct seal shows no drips at the port and no rattling under wind load.
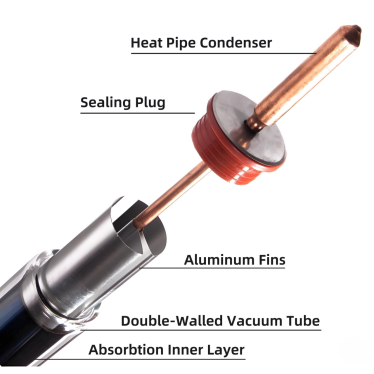
Maintenance Cadence and Procurement Advice
Inspection Routine and When to Keep a Spare Tube
Inspect the bank every three months and after hail or heavy storms. Keep at least two spare vacuum tubes on site for a typical residential array, more for commercial plants. When buying, match the outer diameter and length, usually 58 mm by 1800 mm, and confirm the borosilicate grade. Good maintenance extends collector life well beyond the expected service span without surprise downtime. When selecting a spare, source it from the original supplier channel so the borosilicate grade and coating match; mismatched tubes perform unevenly. In daily use, keep the mounting frame clean and check the rubber seal seats after each storm. During commissioning, avoid striking the open end, as the silicone gasket only protects against expansion, not impact. Train staff to perform the basic swap safely.
In short, a failed Demax vacuum tube is a single-point repair, not a system rebuild. With the right spare tube, basic tools, and safety gloves, most technicians restore full performance in under an hour. Treat the tubes as consumable components, keep a small stock, and follow a quarterly inspection rhythm to protect the whole solar water heater investment.
Frequently Asked Questions
Question
Can a single tube be replaced without stopping the whole system?
Answer: Yes. Each vacuum tube seals independently into the header, so removing one does not break the seal of neighbouring units. The remaining tubes keep heating water while the failed unit is swapped. Only the affected port needs attention, which keeps the solar water heater running through the repair. Plan the swap during a cool part of the day to avoid thermal stress on adjacent glass.
Question
How is a failed tube identified before removal?
Answer: Look for a white, silvery film on the inner glass and a cool surface after sunlight exposure. A depressurised tube loses its mirror-like absorber and delivers lower outlet temperature. Comparing neighbouring units makes the weak one obvious. Early detection through quarterly checks prevents the failed unit from reducing the whole array's thermal output.
Question
Why does the silicone gasket matter during replacement?
Answer: The silicone gasket cushions the borosilicate glass against thermal expansion and keeps the seal watertight at the header port. A worn or missing gasket lets air and moisture reach the joint and shortens tube life. Always fit a fresh gasket with every spare tube to maintain the independent sealing that makes individual replacement practical and safe.
Question
What tools are needed for a safe tube swap?
Answer: Safety gloves, eye protection, a soft brush, a clean silicone gasket, and a matching spare tube are sufficient for most jobs. Isolate the system and let components cool before starting. Avoid metal tools that could chip the glass envelope. A careful, slow twist breaks the rubber seal without stressing the surrounding mounting frame or adjacent tubes.
Question
Where should spare tubes be stored on site?
Answer: Keep spare tubes in a dry, padded crate away from foot traffic and direct impact. Store them upright or laid in foam to protect the glass envelope and rubber seal from dust and knocks. A small on-site stock of two or more units shortens downtime after hail or storm damage and keeps maintenance simple for remote installations.